In 2022, obtaining an NBI approval will be more simpler and less of a nuisance. lengthy lines to online applications Since you may now register from the convenience of your home, it will save you time and effort.
It is necessary to schedule an appointment online if you intend to obtain an NBI Clearance in the Philippines. The NBI now follows the “no appointment, no entry” policy. In this article, we’ll explain how to secure an online appointment for NBI clearance as well as how to register for it.
NBI Clearance Requirements
Basically, for the NBI appointment, you just need to prepare your payment. After doing the appointment online, what you need to bring when claiming your NBI clearance are the following:
- Two Valid Id’s either of the following: UMID, PASSPORT, DRIVER’S LICENSE, BIRTH CERTIFICATE AUTHENTICATED BY PSA (ORIGINAL COPY), PRC LICENSE, BIR/TIN ID, POSTAL ID, PHILHEALTH ID, PAG IBIG ID etc.
Please keep in mind that Non-Government issued I.D’s such as Company IDs and Barangay Clearance are NOT ACCEPTED as Valid I.D’s in processing NBI clearance. Additionally, a Barangay Certificate is required for First Time Job Seekers availing of the free service under RA 11261.
- Application form or reference number (from the online appointment)
- Payment receipt
NBI Clearance Online Application
Here are the steps for NBI online application and NBI online appointment
STEP 1: NBI Online Registration
- Go to the NBI website: https://clearance.nbi.gov.ph/.
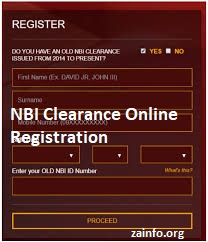
- Register an account by filling out the form located on the right side of the page. For new applicants, tick the “NO” box as an answer to the question “Do you have an NBI Clearance issued from 2011 to the present?”.
- Complete the required information then accept the terms and conditions. Click the sign-up button to register.
- Note: NBI implements one email address for one user policy.
- Sign in using the email address and password you provide during the initial application. You will then be taken to your profile where you need to fill out some additional information. Click the “Save Information” button below the page after you finish. Meanwhile, if you want to edit, you can click the “Edit Information”.
STEP 2: NBI Online Appointment
- Review all the details that you enter to avoid unnecessary mistakes.
- Click the “Apply for Clearance” button at the upper right corner of the screen.
- A pop-up box will appear asking you what ID will you present at your appointment time for verification. (Bring the ID you provide on your appointment day.) Click the “I agree button to certify that all the information you enter is true and correct.
- Schedule an appointment by selecting your preferred NBI Clearance Center branch where you will process your NBI Clearance. Afterward, choose a date that suits your schedule. Boxes with blue shades are the vacant slots.
- Important Reminder: Select your NBI appointment carefully since you cannot change or rescheduled it after your payment. Meanwhile, if you were not able to come to your scheduled appointment, NBI still allows you to go within 15 days from the date of your appointment to your NBI branch to process your NBI application.
Step 3: NBI Clearance Payment
- Select what payment method you like. There are different payment options that you can choose from. This includes the following: bank over-the-counter, online bank, Bayad Center, MultiPay, ECPay, and 7-Eleven.
- After choosing the payment method, a payment reminder will be shown then click the “Proceed” button.
- A transaction summary will pop up. NBI clearance will cost you P130 plus a P25 transaction fee(a total of P155).
- Click proceed to payment button, depending on what payment channel you choose a pop-up window will take you either to an online banking portal or will give you your reference number with the total amount.
- Write down your reference number and pay your NBI clearance to the branch you selected. Note: The reference number will serve as your pass to enter the NBI center.
- Click the “transaction” button to check if your payment already enters. The status will be changed from pending to paid. The confirmation of payment will be sent to your email.
- If you want to print the application form, you can do so but it is not mandatory. The reference number will be enough to present.
Step 4: NBI Clearance processing
- Go to the NBI center with your application form or reference number, your valid ID, and payment receipt.
- Your photo, fingerprint, and signature will be taken. Wait for a few minutes and your NBI clearance will be released if you don’t have a hit. If you have a hit on your name, you will be asked to return after a few days. That’s how easy to get an NBI clearance.
NBI Clearance Fees
The NBI Clearance fee is P130 plus a transaction fee of P25 for the e-payment service. It will cost you a total of P155.